motorharp: line drawing of kid with glasses intently reading (Default)
2023-08-28 07:16 am

Notes on pants Lida Baday McCalls 9371

Lida Baday oversize jacket, halter top, skort, and pants
  • The waistband facing is supposed to be eased in, but I don't know if that's because the SA is 5/8", making it harder to attach than if it were 1/4".
  • The hems need to be interfaced, so the top stitching looks better
  • The hems need to be at least 1" shorter, possibly 1 1/8"
  • Use interfacing tips from deconstructed dress
motorharp: line drawing of kid with glasses intently reading (Default)
2022-02-22 08:08 am

Waffle Patterns Momiji rain jacket

I had a waterproof breathable jacket that I think I made from fabric purchased when you were still allowed to use the Goretex brand name.  It was a Burda pattern, super simple, and super annoying.  It was a pullover (NO), had no pockets for my hands (NO), a kangaroo pocket (ok), an ill-fitting hood (ok), raglan sleeves (yes), an asymmetric closure (yes), and was color-blocked (yes).  The capital NOs outweighed everything else.

It delaminated from age. And the arm holes would rip out regularly because of the whole putting-it-on-over-my-head thing.

I decided I would be environmentally conscious, and use waxed cotton canvas for the replacement.  It turned out to be not remotely waterproof, except that it was another layer for the rain to soak through before it got to me.

So the replacement replacement had to be waterproof breathable fabric, have the same interesting asymmetry and color-blocking-ness, a kangaroo pocket is fine, a taller front collar, and pockets for my hands.

Enter the Momiji Jacket from Waffle Patterns!

Waffle Patterns Momiji Jacket in blue and black colorblocked waterproof breathable fabric

I stumbled across Waffle Patterns a few months ago (or years, whatever). I was immediately drawn to the designs because they had interesting pockets.  Like, there are so many pockets she has a pattern collection of just pockets.  Yes, please.

This jacket pattern is either just a stand-up collar with a kangaroo pocket and tabs on the cuffs, or a hood version with with many pocket variations, also including a kangaroo pocket, but with a hand warmer pocket built in, a chest pocket, a ticket pocket on the sleeve, and a knit cuff.  You can mix and match pockets and details between the versions.  Both have the asymmetric closure. 

I chose view A with the hood and maximum pocket-age, and just a plain cuff. This ticked all the boxes. 

For the fabric, I decided on a blue called Wedgewood and a black ripstop W/P/B. Since the pattern calls for all one color, I had to estimate the amount needed for each block.  I got 1.5 yds black, and 1.25 yds blue.  I could have bought .75 yards of the blue and had enough.

For the pockets, I used a .5 yd piece of leftover reflective fabric from the previous rain jacket project. It's not high vis reflective, but it definitely has a bit.

For the zippers, I wasn't quite sure what gauge I should get, and ended up with #6 for the kangaroo pockets, and #4 for the ticket and chest pockets.  Since I wanted zipper pulls that rotated, I had to buy zipper by the yard. I really wanted plastic zips, but the fabric store had more selection in coil.  I also got a prepackaged plastic zip for the jacket closure.

I wish I had thought more about it and purchased only bottom stops for all the pocket zips.  They don't need to open at the top, and I'd actually feel a little more confident with them closed at both ends.

The pattern pictures have additional details not covered in the instructions.  To the chest pocket, I added a little reflective ribbon tab with a D-ring to hang my compass on.

This is a slim-fitting jacket.  I muslined it and went up two sizes to be able to wear a sweater underneath it (as recommended), and still needed to add 2" to the circumference of the biceps!

Waffle Patterns Momiji Jacket in blue and black colorblocked waterproof breathable fabric

The first step in the instructions was to make the chest pocket. Through no fault of the pattern, I had to remake it SEVEN times. Then one of the kangaroo pocket zipper heads disintigrated. It was just one of those projects.  I fixed them both, but it took me days.

The plastic closure zip was an inch too long, so I cut off some of the top teeth with wire cutters, and wow, those things really fly off to parts unknown!  I'm sure I will be finding them in the years to come.

I realized I put the ticket pocket on the right arm, meant to put the ticket pocket on the left arm, and refused to fix it. No more 7-try pockets.

I modified the sleeve cuffs with a couple buttonholes to accommodate an elastic cord and toggle, so I could snug them up over gloves if needed.

Waffle Patterns Momiji Jacket inside mesh lining

Despite being very careful, I managed to reverse the left and right sleeves in the lining. At least it wasn't in the shell, and I can't tell when wearing it.

Seam sealing really slows down the process of sewing, too.  I'm glad I had a lot of sewing knowledge. This was very challenging.

The jacket looks great (imho) in the above pictures and while wearing, but It's a little awkward to put on - I have to twist around to get the zipper lined up,   For the same reason, I don't like to wear it with the zipper fully open. It hangs a bit oddly.  For ventilation, so far, it's been fine just having it open to the waist.

I wish I had put more reflective material into this jacket while making it. But I refuse to put any more needle holes in the W/P/B that I have to seal! My next project is to get some peel 'n' stick fabric fuse, which despite the name, involves no fusing. It is a way to make stickers from fabric, and I have black and blue high-viz reflective fabric.

I could see making another one of these jackets, maybe out of wool, or something else warm.
...........................................................................................................................................
Started: 1/19/22
Finished: 2/7/22
Cost: ~$100
motorharp: line drawing of kid with glasses intently reading (Default)
2021-12-13 09:28 am
Entry tags:

The fastest knitted gloves


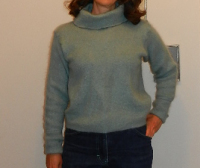
I had a sweater that I had sewed to my size from a thrift store sweater, and it never really did it for me.

Light aqua oversize v-neck sweaterLight aqua cowl neck sweater cut and sewn from oversize v-neck sweater
Before and after

Enter my desire for a beret! And a felted sweater would be perfect material, right? I washed and dried it on the hottest settings, and I think it shrank about 25%, and became a delightfully dense and cushy fabric.

And enter my remembering after making the beret that they never fit right, even though I make them to size.

And also enter the leftover sleeves after making the beret. There was enough for a cozy pair of gloves!

I went on a vintage glove-making spree a few years ago (until I realized I can't find vintage-quality glove material), so had an almost perfect pattern.

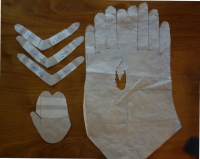
Self drafted glove pattern

I tweaked the hand so the fingers are straight (the gloves I traced had been worn and were consequently stretched). I also prefer the shaped fourchettes instead of straight. If you look at where fingers join hands, you may notice the join is higher on the palm side than the back-of-the-hand side. And so the finger cuts on the pattern end slightly higher on the palm side. Hence the V-shaped fourchettes.

Gloves cut and sewn from light aqua felted sweater right side outGloves cut and sewn from light aqua felted sweater inside out

Serging was maybe not the best option for finishing the seams on the inside, but it was the quickest. I had a dickens of a time shaping the ends of the fingers. Sergers are not meant to go around tiny curves.

The thumbs always surprise me when they pop right in. Both the thumb and the opening are confusing shapes.

A hand wearing a glove cut and sewn from light aqua felted sweater back side upA hand wearing glove cut and sewn from light aqua felted sweater palm side up

They are indeed snuggly and very warm, and kept my hands that way even in the downpour yesterday.

If you are interested in making your own gloves, https://glove.org/ is a good place to start.
motorharp: line drawing of kid with glasses intently reading (Default)
2021-05-27 08:13 am

Past Patterns Riding Habit #902


past patterns #902 lavender acetate cotton tafetta Victorian equestrienne riding habit front view buttoned

I bought this pattern in high school. While I really, really like this now, I would have LOVED it then. I originally wanted to make it in a sky blue cotton velveteen. I don't remember why I didn't make it then; maybe I was intimidated by the addition of boning, or maybe it was my short attention span. I have it now!

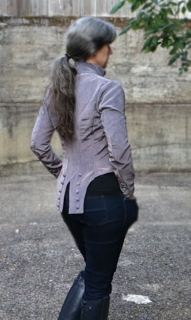
past patterns #902 lavender acetate cotton tafetta Victorian equestrienne riding habit back view with tails
The tails!


past patterns #902 lavender acetate cotton tafetta Victorian equestrienne riding habit front view buttoned
The buttons!


This is a really good basic bodice pattern, as reviewer Sorrel Smith said over at The Great Pattern Review. Would I make it again? Possibly, using it as a jumping off point. It would probably look good with lapels. I would also need to make the neck a smaller diameter. I didn't compensate for that when I added width to the center fronts.

past patterns #902 lavender acetate cotton tafetta Victorian equestrienne riding habit front view unbuttoned


It is also a surprisingly handy little jacket. It is an unexpectedly warm, light layer and perfect for spring. I can't really wear it over anything other than a t-shirt anyway. the sleeves really are quite tight. I think the jacket would hang better through the back if the sleeves hung on my arms properly.

past patterns #902 lavender acetate cotton tafetta Victorian equestrienne riding habit side front view unbuttoned


So no bike riding or harp playing in this thing, or anything that requires me to move my arms forward and bend them.

past patterns #902 lavender acetate cotton tafetta Victorian equestrienne riding habit back view
But so what! The tails!


* Click on any picture to see it bigger.
** Past Patterns has a note on their website for #902: This pattern is currently being updated and so it is listed out of stock. Not sure what's being updated - it seems fine to me.

Fabric: Cotton/acetate faille, possibly from Schoolhouse Fabrics (I still miss that place)
Cost: ?  Maybe $12 for the one piece of lining I needed and thread?
Time: Too. Much. Hand sewing. 3/24 dyed fabric, 3/30, 31 alter pattern and cut and muslin, 4/2 almost killed myself with my iron, 4/3 new iron, 4/5,6 sewed and found I needed buttons and sleeve lining, 4/10 fabric store, 4/11 organized button stash and found buttons!, 4/12 -15, 18, 26-30, 5/2-6 sewed, 5/8 finished! Conservatively, probably a total of about 34 hours.

ETA: My mom refers to the tails as "butt flaps" and I kind of can't not call them that now.

motorharp: line drawing of kid with glasses intently reading (Default)
2021-05-23 08:11 pm

So many buttons... pt. 2

Animation of sewing on 10 covered buttons

I got so tired of sewing on the buttons that I didn't make a full gif. As mentioned before, you can click on the above to replay the animation. Also, as mentioned before, I only, ha "only", needed 10 buttons for the tails. I love these tails!

past patterns #902 lavender acetate cotton tafetta front bodice with collar

After the buttons are sewn on the tails, the tails are finished with a bit of lining to hide everything and tidy up the edges.  The collar did turn out a little big. Not sure why since the basted version fit fine.

past patterns #902 lavender acetate cotton tafetta sleeves with three button vents

Then the sleeves are made, and I made them as big as possible through the biceps and forearms. And I also made them backwards. The images in the instructions were a bit confusing to me, and I should have paid attention to the actual pattern piece names. I ended up doing yet more hand sewing and tacking down the sleeve vents so they didn't stick out weirdly due to facing the wrong way. And I did that after making three buttonholes and sewing three buttons on each vent.

past patterns #902 lavender acetate cotton tafetta front bodice with buttonholes marked and covered buttons waiting to be made

The home stretch - making 17 buttonholes and 17 buttons. The pattern recommend making handmade buttonholes. HAHAHA!

past patterns #902 lavender acetate cotton tafetta front bodice with buttonholes finished and covered buttons waiting to be made

I had about 1/4 of one layer of thread left on the spool after sewing all these buttonholes. My heart was beating a little hard, and there were several stops to wind more thread on the bobbin, but not too much, so I wouldn't run out of either the thread or bobbin one before the other. And it was especially nerve-wracking because I had just been at the fabric store the prior day and thought "I have plenty of thread! I'm sure I don't need to buy anymore!" Thankfully, I was right.

past patterns #902 lavender acetate cotton tafetta front bodice with buttonholes finished and covered buttons made

The buttons ready to be sewn on. I think it took me 4 hours to sew all 17 buttons on the front.

Next up, the actual jacket on an actual person!

motorharp: line drawing of kid with glasses intently reading (Default)
2021-05-19 08:37 am

So many buttons... pt. 1


Animation of making 12 covered buttons

All the pieces of this jacket are underlined, which meant hand-basting around all the edges of all the pieces. If there is a next time, I would probably line it, as well or instead, because the seam edges are also supposed to be overcast by hand. Well, I can tell you I gave up on that pretty quick and got out the serger. And even that was too much sewing.

The fronts and back are made separately, and before sewn together, the buttons are attached to the tails.

past patterns #902 lavender acetate cotton tafetta left bodice front with two dartspast patterns #902 lavender acetate cotton tafetta back bodice with 6 seamed sections

And so begins the saga of the buttons.*

I would like to be an organized person. Some things are well organized, like my sock drawer. Other things are not, like almost every single sewing thing I own. I think I mentioned in a previous post I finally organized my fabric. It is nice.

This jacket requires 33 buttons for the size I made. Covered buttons would look nice, right? I looked in my covered button box and had one package of 5/8" size. So I would need 28. Ugh. Do I order in bulk and get way too many? Do I try to find that many in the fabric store and pay way too much?

I dithered for almost a week.

Then I got a wild hair to organize my three boxes of closures, including the one that contained that one package of buttons. In addition to covered buttons of various sizes, I have pearl snaps, grommets (eyelets), a bunch of vintage self-covered belt kits that I picked up every time I went to a now-defunct craft thrift store, and ... a bunch of covered button kits that I picked up every time I went to a now-defunct craft thrift store.

People, I had 32 buttons total.

Aaaargh!

But wait! [personal profile] gorthx to the rescue with the last remaining button!

But wait! Some packages said 5/8" and some said 9/16". Now I had to figure out how to disperse them so the size difference would not be noticeable. Twelve for the tails, six for the sleeves, and 17 for the front.

Yeah, that doesn't add up to 33. I made the above pictured twelve for the tails, realized I only needed ten, then lost track of which size I made. So measured them, and all the buttons were 9/16", even the ones marked 5/8". *shrug*

I made the buttons at each stage instead of making them all at once, so stay tuned for more button content.

* You can click on the top pic to watch a gif. Who knew you could make animations in gimp.

motorharp: line drawing of kid with glasses intently reading (Default)
2021-05-16 03:05 pm

Fitting the riding habit

I had optimistically cut out the size 12 back when I first bought the pattern. Not that I'm not a size 12, it just took me a few decades after buying it to actually make it.

My trusty bunka sloper came to the rescue again - I added 1" to both center fronts (for a total of 2") and that was it. Really. The shoulders were surprisingly fine! Then I read a review over on Greater Bay Area Costumers Guild (ctrl+f or scroll down to #902) that said the shoulders on this pattern are really square.

I studiously avoided the major dye blobs when cutting it out. I basted it together and it fit almost perfectly. I don't think I've ever had something fit me this well on the first pass. Am I Victorian shaped?

The only thing that didn't fit were the sleeves. They are pretty tight on me. I decided to sew them bigger, as much as the seam allowances would allow.

I guess Victorian ladies weren't buying tickets to the gun show.


motorharp: line drawing of kid with glasses intently reading (Default)
2021-05-11 05:03 pm

Dyeing more fabric and changing my mind


This fabric was originally on the back of a velvet biscuit quilt I made in the 90s, was bubble gum pink, and was going to be turned into a muslin for tuxedo blazer.

I took apart the quilt a few years ago because it was Time, and kept the backing. I have no idea why I decided to put a bright pink cotton/acetate faille on the back of a heavy velvet quilt. It always slid off my bed within a matter of minutes leaving me freezing.

There were two pieces each about 2.5 yds long and 35" wide. I had drafted a tuxedo jacket pattern that I wanted to muslin, and thought a fancy, shiny fabric might be nice if the muslin turned out to be wearable.

However, not pink. So I got out the dye. Again. I thought I'd try black, knowing that cotton dye would probably only work on the cotton fibers, but hoping for the best.

What I got was so much better!


It came out a beautiful antique lilac color! The cotton is definitely black, but the pink in the acetate just got toned down a bit. Combined they are a color that is an exact match for the Coats and Clark thread color "Light Vintage Purple".

Well, it was mostly that color.

This is why it's important to prewash your fabric before dyeing. I'm going to say this is a bird shape, but it also looks weirdly lewd to me. I washed the fabric with synthrapol, twice, and the water was lifetime-smoker-yellow both times. *shudder*

I do, however, really really like the more subtle gradients of color that occurred in the rest of the fabric. So much! I think it adds to the antique look of it.  I decided this special fabric needed to be a much more special jacket than my original plan.

Enter the Victorian equestrienne bodice that I've been wanting to make since high school.


Past Patterns #902

Stay tuned for more...

*click on any picture to see it bigger.

motorharp: line drawing of kid with glasses intently reading (Default)
2021-05-11 10:48 am
Entry tags:

All of my pajamas are failing at once

I stuck my thumb through what I thought was the buttonhole in the waistband of my spring pajamas. It was not.

A fast run to the fabric store, a sort-of fast choice of fabric, a quick wash, and a quick sew. This was a welcome (relatively) instant gratification project after the month(s?) spent hand-sewing my Victorian jacket.

The fabric is a really good quality - slightly heavier weight and very smooth. I used most of my notes from making the sloth pajamas, but didn't do quite as good a job. I'm blaming that on my vertigo.

I think I might call these my "She Blinded me with Science" pajamas.

Black with colorful science equipment illustrations blue piping green buttons short sleeve long pants pajamas
You can click to make bigger.

*Note to self: I need to mark the shirt pattern so I line up the collar properly.

Fabric: 4.5 yards of Michael Miller Science Lab Stem Squad designed by Edward Miller, 100% cotton
Cost: A late Christmas/birthday gift
Time: 5/9 cut out, 5/10 finished, probably a total of four hours

motorharp: line drawing of kid with glasses intently reading (Default)
2021-03-25 10:52 am
Entry tags:

Non-zippered zippered trousers

I made another pair of Burdastyle 07-2010-104 zippered trousers, but I didn't add zippers, and made them longer, so I guess they are actually view 103B or C.

The pants were so comfortable I wanted another pair, but in black. I was so sure I had seen the same olive fabric in black - a dense twill weave with about 20% stretch. I either hadn't, or it was gone. I thought, "I'll dye it!" and bought some.

These went together super quick after finally pre-washing the fabric, probably because I wasn't destroying zipper tape.

I left them un-hemmed because I figured the hot temperature of the dye bath might shrink them. Normally, you don't have to use super hot water to dye cotton, but this was Hot Black, and it's extra special. It takes 130° to 180°F water (as opposed to 105°F hot tap water), 2x the amount of salt, and 2x the amount of time, plus using the recommended dye fixative.1,2

After dyeing and letting them dry a bit, I ran them through an actual washing machine because the dye was  e x h a u s t i n g  and wouldn't stop, despite the fixative.

They seem to finally be stable and are hemmed, and once again, I love them. Bonus: they have replaced a pair of pants I don't love, so I have maintained closet equilibrium.

Fabric: Cotton stretch twill 60"wide 1 3/4 yds
Cost: $26.23 fabric, $6.59 dye
Time: 3/13 fabric purchased, 3/21 cut out, 3/22 sewed and finished, 3/24 dyed, 3/25 hemmed and finished

1. I dyed some other things the same day. That might be another post.
2. Also, I bought four cans of salt, and ran out due to the multiple dye jobs. I'm glad I didn't get the same checker at the grocery store the second time.
motorharp: line drawing of kid with glasses intently reading (Default)
2021-03-12 12:32 pm
Entry tags:

Tunic fail or Armistice win

Ar·​mi·​stice | \ ˈär-mə-stəs \
Definition of armistice: a formal agreement of warring parties to stop fighting.


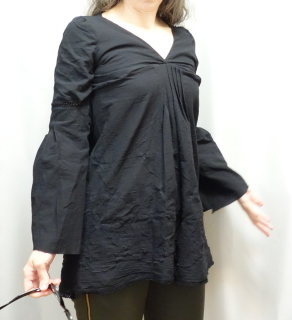
Egregiously ill-fitting tunic made from embroidered black cotton gauze shown on women's torso
I tried to come to an accord with this tunic.


Embroidered black cotton gauze Armistice blouse with 3/4 length sleeves front inset panel square collar displayed flatEmbroidered black cotton gauze Armistice blouse with 3/4 length sleeves back gathers at waist displayed flat
Click to make bigger!

No, but really, this is another Edwardian blouse, which Folkwear says dates back to 1918, the end of WWI, hence, Armistice blouse.

I had wanted to make one out of the horrible tunic, but was on the fence about using this particular fabric for that. Then I saw The Peculiar Stitch's version and that brought me down on the side of "yes".

Using my bunka sloper, I checked the distance from both the center front and center back to shoulder seams and settled on a size medium.

I used her alterations (including the #NotTodaySatan exclusion of buttonholes), except I think my sleeves were 14" in length. The cuffs are the same size.

The cuffs and collar are faced with some sort of poly(I think)/cotton. It does not behave like 100% cotton. That gave it some oomph.

The hem is not flattering to me and does not need trim, but since I will most likely be wearing it tucked in, it's not getting fixed (especially since the trim is zigzagged on!)

I raised the front panel 1.5" without the trim (which in this case is just two pieces of time stitched together (that's supposed to be "trim", but I like my mistyped version SO MUCH BETTER). This is a Low Cut blouse. It's still a bit low and I need to watch it when I lean over.

Fabric: Black embroidered 100% cotton gauze
Cost: Can't remember, but this is the third garment made from the original cut of fabric, so it's probably like, $.02
Time: 2/22-23 traced pattern, 2/24-25 & 3/1 sewed, 3/2 finished

motorharp: line drawing of kid with glasses intently reading (Default)
2021-03-11 09:00 am
Entry tags:

Burdastyle 078-2010-104 Zipper trousers


Olive green stretch twill trousers with pockets fly front and side seam brass zippersOlive green stretch twill trousers with back pocket brass zipper closures and side back seam

Burda 07/2010 #104  (link to the German site, the American one still seems to be having issues after the change in ... management?) is a pattern from over a decade ago.

I made this pattern before and it was... not great. The fabric was way too stretchy and weirdly polyesterish.

This time, I used my jamie jeans as a fitting template. This fabric has about 20% stretch. Jamie requires at least 30%. The pattern pieces are so different, but it looked like this pattern was about 10% bigger through the hip. So I just cut on the original lines. And that size was either a size 38 or 40.

I took in an inch width of the center back seam at the waist, and subsequently had to add 1 1/4" in height, which gave a deeper yoke.

These jeans would be slightly more comfortable with 4.5 gauge zippers. Apparently, the color I wanted is not sold anywhere in continuous yardage. All I could find was 5-gauge and they are a little too beefy.

Making the zippers was a bit of a learning curve. I ended up mangling a couple of the tapes trying to remove the teeth before I figured out how to cut them off without getting the tape caught in the jaws of the wire cutters. It looked like I had discovered gold - flakes were flying everywhere.

I bought 2.5 yards and had about 10" extra, and that was a good thing. I lengthened the pants 1" longer than the pattern, and I definitely don't have longer legs. The zippers do NOT open all the way up, there is a backing strip that ends just below the knees.

Also, I didn't realize the zipper pulls weren't the dangly kind, ie, with rounded corners.

They fit and are very comfortable. They do, however, tend to stretch out and not quite recover. I'm guessing that's a function of the twill weave, not the stretch part.

This was another project I immediately wanted another pair of. What is happening.

Without zips, though.

Fabric: Cotton stretch twill 60"wide 1 3/4 yds
Cost: $26.23 fabric, 3.10 thread, 14.27 zippers
Time: 1/30 fabric purchased, 2/9 zippers purchased, laid out pattern 2/14, sewed 2/15-16, finished 2/16
motorharp: line drawing of kid with glasses intently reading (Default)
2021-02-12 04:17 pm
Entry tags:

Winter wonderland blouse or, Butterick 3695


Black with blue stars and red and white snowflakes long sleeve button down 1946 vintage blouse
The most luxurious vintage rayon
gifted to me by a former coworker.
I wasn't sure about the print, but I love it sewn up!
Vintage Butterick 3695 from 1946.
motorharp: line drawing of kid with glasses intently reading (Default)
2021-02-10 03:18 pm
Entry tags:

Sloth pajamas


Dark blue background with grey sloth hanging from ivory branch flannel fabric

Hey, buddy!

With the thought of an unknown number of many more months of pandemic staying-at-home, I wanted to indulge in something cozy to wear. I haven't had flannel pajamas in forever, and another pair were wearing out, so I splurged.

None of the flannels at the fabric store were really jumping out at me, until I walked past the sloths hidden among the pastels of the childrens' section. Sloths!

Dark blue with grey sloths flannel pajamas long sleeved button front top and drawstring bottoms with ivory piping details

I have my TNT (tried 'n' true) pajama pattern I traced from a pair I got from delia's (or I should say dELiA*s (remember the mixed case trend?)) many years ago. Oh wow, 20 years ago. That prompted me to think, "Are they still in business?" The reply is, "I guess?"

Anyway.

Instead of the delia's top, I used a vintage camp shirt pattern that I traced from an existing shirt and made it long sleeved.

I like using patterns based on manufactured clothes, because their construction tends to be based on efficiency, and I can always make my jimjams super quick. The piping slows me down, but is so worth it. I did a pretty good job, if I do say so myself.

Ivory piping on collar and lapel of dark blue flannel with ivory and grey sloths pajamas
I love me some pjs with piping.

I made a few changes when cutting this time:
- shortened pants like a previous pair I made, and they could be longer
- added 1 inch to inside leg on both front and back at crotch, tapering to knee
- skipped the elastic in the waistband

Dark blue with grey sloths flannel pajama top with ivory piping around cuffs, collar, lapels, and pocket topDark blue with grey sloths flannel pajama top with back yoke and darts, and ivory piping around cuffs and collar.

Things that still need to be changed:
- back pockets need to be longer
- sleeved head is still too wide for armscye

Say, maybe I need to redraft this pattern.

Dark blue with grey sloths flannel pajama bottoms with ivory piping around cuffsDark blue with grey sloths flannel pajama bottoms with ivory piping around cuffs, and tops of back pockets.

I finished at 10pm, just in time for bed... aaaand realized I cut the drawstring 10" short. Whoops. I had a bit of a panic when I woke up to use the bathroom and found the drawstring tightly knotted. Nooooo!

Now they are done just in time to stay cozy during the cold and snow. (Still not holding my breath.)

Fabric: Riley Blake Designs Pattern F7804, JOEY by deena rutter c2019, www.RileyBlakeDesigns.com
Cost: $56.95, ulp! But so worth it.
Thread and 5 yds of piping: $7.76
Time: 1/30 bought fabric, 2/7 laid out pattern, 2/8 cut out and sewed, 2/9 finished, or rather 2/10 finished the new drawstring.
motorharp: line drawing of kid with glasses intently reading (Default)
2021-02-02 11:23 am
Entry tags:

Edwardian blouse test


Front view of light blue cotton Edwardian shirtwaist blouse with tucks

There is a lot about this blouse
I would change - fabric, spacing of the tucks, length.
But, it is pretty comfortable.
And I need a little Edwardian necktie thingy.
Original pattern from Past Patterns.
motorharp: line drawing of kid with glasses intently reading (Default)
2021-01-21 11:03 am
Entry tags:

A shirt and sweater

Grey raglan sweater detail

Detail of a sweater I finished last year, ie 2019.
It is from a German pattern magazine called Rebecca.
It is lambswool from an unraveled other Rebecca sweater, originally from an unraveled J. Crew sweater.
This yarn has been *used*.


Fabric I bought last weekend.
It fits and is very very comfortable.
It will probably get worn mostly under sweaters, because I'm not sure I like the print.
Which I managed to accidentally match across the front.
 
motorharp: line drawing of kid with glasses intently reading (Default)
2020-06-20 09:01 am
Entry tags:

Arduously striped Jalie YOKO top

Earlier in quarantine, Jalie announced... actually, I can't remember how it happened. Did Jalie announce a free pattern? Did I read about it on a blog? Who knows. Anyway, the Jalie YOKO top is a free pattern that is basically a square with sleeves, so easy, right? Ha!  And it looks like something I'd want to add to my wardrobe.

It's a really cool pdf where you can turn on and print only your size. No multiple lines to follow.

I went through my fabric stash in... April? and realized I had a lot of annoyingly small scraps of stretchy fabric that I probably couldn't do anything with.

Or could I?
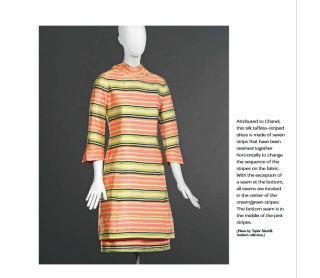
Seamed striped Chanel silk taffeta dressSeamed Chanel striped wool and mohair blouse
Images from Claire Shaeffer's book "Couture Sewing Techniques", photo credit Taylor Sherrill

I would recommend Claire Shaeffer's book for the photos alone. She has a great collection of couture.  The two items above specifically are constructed by sewing striped fabric together to make different fabric.  The one on the left has been seamed together to change the order of the stripes, and the top on the right has been seamed to prevent the lowest stripe from being teal.

If Chanel can sew stripes together, SO CAN I! My garment would definitely not be couture, though.

So how to get stripes out of the scraps I had?  I wanted to figure out how tall I could cut the strips and have the exact width needed to fit on all my pattern pieces, with none leftover. Reduce, reuse, recycle.

I needed some sort of math equation to figure that out. I felt like I knew how to do this - it was on the tip of my tongue - I just couldn't get my brain to work!  Bias strip calculations are similar, but didn't help because they have the height specified, ie 2", 3", 4.5", etc. It's simple to figure out how many strips you'd get from a square that way. I thought I could reverse engineer that and figure out something iterative from that. Would I need limits? Integrals? Did I need calculus for this?

So I set it aside for a bit. How long? Who knows these days.

When I came back to it, I played around with different stripe configurations on the model. I like the way I look in larger stripes. I wanted something that would be shaded from top to bottom, light to dark.

And what do you know, the YOKO top size T is evenly divisible into 2" and 5" sections.


I just went ahead and assumed I had enough fabric. Enough grey fabric.


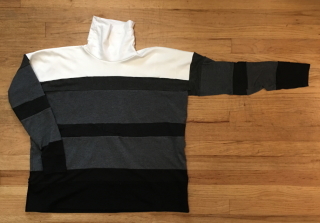
I vertically seamed the fabric together, cut 5.5" and 2.5" high strips. I laid them out on the pattern pieces. It was not quite the gentle gradient from top to bottom that I wanted. If only I had a lighter shade of grey.

 
I cut them to torso and sleeve widths, then seamed them horizontally to make the final fabric. I was short by about 2" of one color, so I subbed in a different color. But I had enough of everything else!


This took a loooonnnngggg time.

And done.


Where the shoulder in the right side of the photo below starts to curve down is where my shoulder starts to curve down, so it's an accurate line-up of the stripes in the sleeve to the stripes in the torso when I'm wearing it.

It's a great lounging-around-the-house item. Nice scrunchy neck, nice scrunchy sleeves.

It would, however,  be more comfortable if there weren't a million serged seams with different amounts of stretch.

I want to make another one! From one piece of fabric, this would probably take an hour to make. And maybe a medium to heavy weight stretch knit. This would be dreamy out of sweatshirt fleece.

And, of course, I found the perfect shade of light grey after I finished and went through some OTHER fabric. *shakes fist at the sewing gods*

motorharp: line drawing of kid with glasses intently reading (Default)
2020-01-29 04:26 pm
Entry tags:

Moulage vs sloper vs block

I finally found an online source that answers my question about how much ease is supposed to be in a sloper. Dresspatternmaking answered that for me. 

Also, there's an explanation of blocks and patterns on an odd site called EssentiaList.

A moulage is an exact replica of you in fabric - the measurements are the same with no ease and could be used to cover a dressform to make it your double.

A sloper fits you with a little bit of ease. (Possibly 4" in the bust, which to me is not a "little bit". Or maybe I need to reread some things.)

A block is made from the sloper and has ease added depending on what it is, say a jacket, dress, or a sleeveless top sloper.

The actual patterns used to make the garments are drafted from the blocks, so you could make several different styles of jacket patterns from your jacket block.

At least, this is the information I found that finally makes sense to me.


motorharp: line drawing of kid with glasses intently reading (Default)
2020-01-23 09:01 am
Entry tags:

Another finished haori


Black Wiksten Haori with red lining, cuffs turned up

Immediately after making the blue jacket, I wanted another one, this time bigger than a size XS. I can't remember what size I did make. Oops.  This was also made in April. Or May. I wish I'd kept track. Oops again.

I actually bought fabric for the main color - black linen.*

The lining was a piece of vintage fabric gifted to me by a coworker.  It was narrow and a little over 3 yards, so there was some piecing happening there, too.

Black Wiksten Haori with red lining, cuffs turned up

I don't wear it red-side out as it's not quite my color, but I do like the pop it gives at the cuffs.

*I used some leftovers for  the sleep mask I just made.

motorharp: line drawing of kid with glasses intently reading (Default)
2020-01-22 02:32 pm
Entry tags:

Finished Wiksten Haori

In April, I cut up a bunch of clothes and made news clothes. One of the things that resulted was a haori from the Wiksten pattern. I had to do a bunch of piecing and I drew lines where some of the piecing happened.

Blue Wiksten Haori frontBlue Wiksten Haori front lines
Blue Wiksten Haori backBlue Wiksten Haori back lines
The seams are the same on both sides, I just drew one side.

The dark blue linen used to be an SCA garment similar to this tunic, without the front gore. It was a really wonderful way to use up an entire amount of yardage. However, I wore it once, and regretted not wearing it again. The haori is another way to efficiently use fabric.

The collar is silk dupioni from my stash that I also had to piece.

The inside (which you can wear on the outside - this is reversible jacket) was the lining for a robe that I also never wore. I didn't have to piece that as much.

Blue Wiksten Haori inside frontBlue Wiksten Haori inside front lines

I always have problems with fusible interfacing. I've never not had it bubble. The smaller collar piece on the left is cut on a different grain than the rest, and the interfacing seemed to do worse. ?

Blue Wiksten Haori inside back Blue Wiksten Haori inside back lines


I wear this jacket so much!