motorharp: line drawing of kid with glasses intently reading (Default)


past patterns #902 lavender acetate cotton tafetta Victorian equestrienne riding habit front view buttoned

I bought this pattern in high school. While I really, really like this now, I would have LOVED it then. I originally wanted to make it in a sky blue cotton velveteen. I don't remember why I didn't make it then; maybe I was intimidated by the addition of boning, or maybe it was my short attention span. I have it now!

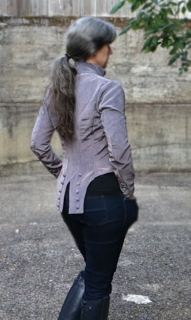
past patterns #902 lavender acetate cotton tafetta Victorian equestrienne riding habit back view with tails
The tails!


past patterns #902 lavender acetate cotton tafetta Victorian equestrienne riding habit front view buttoned
The buttons!


This is a really good basic bodice pattern, as reviewer Sorrel Smith said over at The Great Pattern Review. Would I make it again? Possibly, using it as a jumping off point. It would probably look good with lapels. I would also need to make the neck a smaller diameter. I didn't compensate for that when I added width to the center fronts.

past patterns #902 lavender acetate cotton tafetta Victorian equestrienne riding habit front view unbuttoned


It is also a surprisingly handy little jacket. It is an unexpectedly warm, light layer and perfect for spring. I can't really wear it over anything other than a t-shirt anyway. the sleeves really are quite tight. I think the jacket would hang better through the back if the sleeves hung on my arms properly.

past patterns #902 lavender acetate cotton tafetta Victorian equestrienne riding habit side front view unbuttoned


So no bike riding or harp playing in this thing, or anything that requires me to move my arms forward and bend them.

past patterns #902 lavender acetate cotton tafetta Victorian equestrienne riding habit back view
But so what! The tails!


* Click on any picture to see it bigger.
** Past Patterns has a note on their website for #902: This pattern is currently being updated and so it is listed out of stock. Not sure what's being updated - it seems fine to me.

Fabric: Cotton/acetate faille, possibly from Schoolhouse Fabrics (I still miss that place)
Cost: ?  Maybe $12 for the one piece of lining I needed and thread?
Time: Too. Much. Hand sewing. 3/24 dyed fabric, 3/30, 31 alter pattern and cut and muslin, 4/2 almost killed myself with my iron, 4/3 new iron, 4/5,6 sewed and found I needed buttons and sleeve lining, 4/10 fabric store, 4/11 organized button stash and found buttons!, 4/12 -15, 18, 26-30, 5/2-6 sewed, 5/8 finished! Conservatively, probably a total of about 34 hours.

ETA: My mom refers to the tails as "butt flaps" and I kind of can't not call them that now.

motorharp: line drawing of kid with glasses intently reading (Default)
Animation of sewing on 10 covered buttons

I got so tired of sewing on the buttons that I didn't make a full gif. As mentioned before, you can click on the above to replay the animation. Also, as mentioned before, I only, ha "only", needed 10 buttons for the tails. I love these tails!

past patterns #902 lavender acetate cotton tafetta front bodice with collar

After the buttons are sewn on the tails, the tails are finished with a bit of lining to hide everything and tidy up the edges.  The collar did turn out a little big. Not sure why since the basted version fit fine.

past patterns #902 lavender acetate cotton tafetta sleeves with three button vents

Then the sleeves are made, and I made them as big as possible through the biceps and forearms. And I also made them backwards. The images in the instructions were a bit confusing to me, and I should have paid attention to the actual pattern piece names. I ended up doing yet more hand sewing and tacking down the sleeve vents so they didn't stick out weirdly due to facing the wrong way. And I did that after making three buttonholes and sewing three buttons on each vent.

past patterns #902 lavender acetate cotton tafetta front bodice with buttonholes marked and covered buttons waiting to be made

The home stretch - making 17 buttonholes and 17 buttons. The pattern recommend making handmade buttonholes. HAHAHA!

past patterns #902 lavender acetate cotton tafetta front bodice with buttonholes finished and covered buttons waiting to be made

I had about 1/4 of one layer of thread left on the spool after sewing all these buttonholes. My heart was beating a little hard, and there were several stops to wind more thread on the bobbin, but not too much, so I wouldn't run out of either the thread or bobbin one before the other. And it was especially nerve-wracking because I had just been at the fabric store the prior day and thought "I have plenty of thread! I'm sure I don't need to buy anymore!" Thankfully, I was right.

past patterns #902 lavender acetate cotton tafetta front bodice with buttonholes finished and covered buttons made

The buttons ready to be sewn on. I think it took me 4 hours to sew all 17 buttons on the front.

Next up, the actual jacket on an actual person!

motorharp: line drawing of kid with glasses intently reading (Default)


Animation of making 12 covered buttons

All the pieces of this jacket are underlined, which meant hand-basting around all the edges of all the pieces. If there is a next time, I would probably line it, as well or instead, because the seam edges are also supposed to be overcast by hand. Well, I can tell you I gave up on that pretty quick and got out the serger. And even that was too much sewing.

The fronts and back are made separately, and before sewn together, the buttons are attached to the tails.

past patterns #902 lavender acetate cotton tafetta left bodice front with two dartspast patterns #902 lavender acetate cotton tafetta back bodice with 6 seamed sections

And so begins the saga of the buttons.*

I would like to be an organized person. Some things are well organized, like my sock drawer. Other things are not, like almost every single sewing thing I own. I think I mentioned in a previous post I finally organized my fabric. It is nice.

This jacket requires 33 buttons for the size I made. Covered buttons would look nice, right? I looked in my covered button box and had one package of 5/8" size. So I would need 28. Ugh. Do I order in bulk and get way too many? Do I try to find that many in the fabric store and pay way too much?

I dithered for almost a week.

Then I got a wild hair to organize my three boxes of closures, including the one that contained that one package of buttons. In addition to covered buttons of various sizes, I have pearl snaps, grommets (eyelets), a bunch of vintage self-covered belt kits that I picked up every time I went to a now-defunct craft thrift store, and ... a bunch of covered button kits that I picked up every time I went to a now-defunct craft thrift store.

People, I had 32 buttons total.

Aaaargh!

But wait! [personal profile] gorthx to the rescue with the last remaining button!

But wait! Some packages said 5/8" and some said 9/16". Now I had to figure out how to disperse them so the size difference would not be noticeable. Twelve for the tails, six for the sleeves, and 17 for the front.

Yeah, that doesn't add up to 33. I made the above pictured twelve for the tails, realized I only needed ten, then lost track of which size I made. So measured them, and all the buttons were 9/16", even the ones marked 5/8". *shrug*

I made the buttons at each stage instead of making them all at once, so stay tuned for more button content.

* You can click on the top pic to watch a gif. Who knew you could make animations in gimp.

motorharp: line drawing of kid with glasses intently reading (Default)
I had optimistically cut out the size 12 back when I first bought the pattern. Not that I'm not a size 12, it just took me a few decades after buying it to actually make it.

My trusty bunka sloper came to the rescue again - I added 1" to both center fronts (for a total of 2") and that was it. Really. The shoulders were surprisingly fine! Then I read a review over on Greater Bay Area Costumers Guild (ctrl+f or scroll down to #902) that said the shoulders on this pattern are really square.

I studiously avoided the major dye blobs when cutting it out. I basted it together and it fit almost perfectly. I don't think I've ever had something fit me this well on the first pass. Am I Victorian shaped?

The only thing that didn't fit were the sleeves. They are pretty tight on me. I decided to sew them bigger, as much as the seam allowances would allow.

I guess Victorian ladies weren't buying tickets to the gun show.


motorharp: line drawing of kid with glasses intently reading (Default)

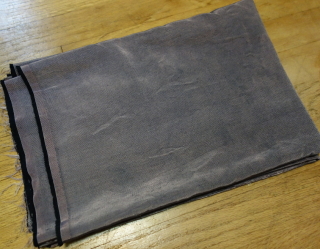
This fabric was originally on the back of a velvet biscuit quilt I made in the 90s, was bubble gum pink, and was going to be turned into a muslin for tuxedo blazer.

I took apart the quilt a few years ago because it was Time, and kept the backing. I have no idea why I decided to put a bright pink cotton/acetate faille on the back of a heavy velvet quilt. It always slid off my bed within a matter of minutes leaving me freezing.

There were two pieces each about 2.5 yds long and 35" wide. I had drafted a tuxedo jacket pattern that I wanted to muslin, and thought a fancy, shiny fabric might be nice if the muslin turned out to be wearable.

However, not pink. So I got out the dye. Again. I thought I'd try black, knowing that cotton dye would probably only work on the cotton fibers, but hoping for the best.

What I got was so much better!


It came out a beautiful antique lilac color! The cotton is definitely black, but the pink in the acetate just got toned down a bit. Combined they are a color that is an exact match for the Coats and Clark thread color "Light Vintage Purple".

Well, it was mostly that color.

This is why it's important to prewash your fabric before dyeing. I'm going to say this is a bird shape, but it also looks weirdly lewd to me. I washed the fabric with synthrapol, twice, and the water was lifetime-smoker-yellow both times. *shudder*

I do, however, really really like the more subtle gradients of color that occurred in the rest of the fabric. So much! I think it adds to the antique look of it.  I decided this special fabric needed to be a much more special jacket than my original plan.

Enter the Victorian equestrienne bodice that I've been wanting to make since high school.


Past Patterns #902

Stay tuned for more...

*click on any picture to see it bigger.

motorharp: line drawing of kid with glasses intently reading (Default)


Black with blue stars and red and white snowflakes long sleeve button down 1946 vintage blouse
The most luxurious vintage rayon
gifted to me by a former coworker.
I wasn't sure about the print, but I love it sewn up!
Vintage Butterick 3695 from 1946.
motorharp: line drawing of kid with glasses intently reading (Default)
My cousin was cleaning out her vintage pattern collection and sent them to me!


Click for very large photos


Plus some toy sailboat instructions. I think I said "Oh my gosh" at each pattern. There are some stunners in here. There is what I thought was a beautiful dress, but turns out it's "just" a housedress.

There are the usual suspects - Simplicity, McCall, Vogue, Butterick, and the lesser known Advance, DuBarry, Hollywood, Marion Martin, and newspaper mail-order. But also some I'd never heard of - Clotilde and Superior. Clotilde patterns come in a delightful glassine envelope. Superior patterns definitely look superior!

Wow!

Wow.
motorharp: line drawing of kid with glasses intently reading (Default)
1-yd-apron-1


I "finished" this apron in January, but then had to go back and re-adjust the front so it didn't gap. I took in a 1" dart at the top of the sweetheart neckline and strap join.

The pattern is a mail-order pattern from... the 40s? There were several mail order services that provided patterns from the same company, possibly called Reader Mail. This particular one was from a magazine called Hoard's Dairyman and is 2299.

The fabric is from one old curtain (late 60s, early 70s) acquired from home over the holidays. I love the fabric. The trim is pretty darling, too. I now have all the curtains and am plotting what to do next. I'm thinking "quilt".

I lengthened this by 3" because I need more coverage. It's still too short. Have you ever gotten peanut butter on your knees?

I modified the shoulder straps to instead go around my neck. After having an apron with crossed straps, and straight straps, around the neck is most convenient for me. The shoulder straps needed an additional 4" (!) taken out of the back.

If I made this again, I would probably fully line it, ie make two aprons, sew them together like a pillow case, and turn right side out, instead of hand sewing all that binding around ALL THE EDGES.
motorharp: line drawing of kid with glasses intently reading (bookworm)
McCalls is finally hopping on the vintage bandwagon, which is great, because they have a long and consistent history of putting out lovely patterns since... the 20s? earlier? up through the 90s, when they did something weird to their sizing. Anyway, I use a lot of vintage McCalls patterns so I was excited by their announcement of their "Archive Collection".  The first two they've released are from 1933 and can be combined to make a suit, or an outfit.  I like that they are basic pieces you could totally use for everyday wear (but I do hope they release some of their fancier designs at some point!).

There's a blouse and jacket 6995.

M6995

The line drawing isn't too impressive, but again, these are good basic pieces.

The skirt 6993 is a little more interesting. What looks like a standard pleated skirt:
M6993

Has great waist details!
M6993dM6993

And then there's a sweet little skirt with a belt. This could be great for showing off a vintage buckle.

M6993a

These older skirts are so flattering - they always seem to just hang better, and I hope McCall's has managed to keep that feature and they continue to release some great vintage designs from their vast catalog.
motorharp: line drawing of kid with glasses intently reading (bookworm)
I'm going to draft the rest of this skirt pattern tonight. With my amazing willpower I will get up out of my seat and clean off the plaster of Paris from my sewing table and get cracking. WITH POCKETS.

black-white-flower-dressblack-white-flower-dress-back-3black-white-flower-dress-back-2black-white-flower-dress-side

I always regret not having POCKETS in my skirts or any garment, really, and always forget to put POCKETS in, so emphasis on POCKETS. POCKETSPOCKETSPOCKETS! I'm forgetting it even as I'm typing it! Geez.

DSCN2192

The fabric is 100% cotton decorator fabric that gorthx gifted me a while ago. It was waiting for a decoupage project, because I thought I only had .5 yds, but it turns out it's 1.75 (yay organized stash!). And it fits in really well with my black and white themed collection. Thanks, gorthx! I hope I can piece it as drawn with the yardage I have. The back has slight variations I can't decide on.

The top will come later - a simple boat-neck sleeveless dealy I think I can draft from... something vintage.

Also, I'm debating on sewing this as part of the Fall For Cotton Sew-Along.

My custom lasts are drying in their negative molds. I'm highly suspicious they will not come out well in the toes.

POCKETS!
motorharp: line drawing of kid with glasses intently reading (bookworm)
These fabrics:
DSCN1906
Silk chiffon and charmeuse


Make this top:
Sea green blouse 3Q

I finished this Simplicity 1891 blouse a while ago, but with a cotton broadcloth underlining that was way too stiff. I decided to reline it with silk charmeuse, since I was able to find the right color. However, that meant trying to take apart something made from silk chiffon, hand basting the shifty layers together, and sewing it back up on the (hopefully) original stitching lines. That were shifting all over the place. Then there were the buttonholes. Ugh. I hand stitched them with regular thread, and that didn't work. I tried one on the machine, and that didn't work either. Then I hand stitched them with embroidery thread and that worked, although I hope no one ever examines them up close.

Sea green blouse back detail

And with that, I think my spring collection from 2010 is finally done. Yay, me?
motorharp: line drawing of kid with glasses intently reading (bookworm)
A few days ago I was croquising (really, it's a word) some vintage patterns to see what might work for some weird, pink, faille, cotton/rayon? fabric I have, which will be dyed, thank you, as I'm not too much of a pink person. Why do I have this fabric? It was super cheap and I used it to line the back of a quilt I made *mumblecough* years ago1. So I have decent yardage.  One of the dresses I thought about making was Retro Butterick 6632.

Butterick-Retro-6632

After croquising it, I realized I had other fabric in my stash that would work really well for this (donated *mumblecough* years ago by my sis2, and remembered and easily accessed now that I'm all organized).
navy-blue-ecru-pinstripe-small

I've been muslining this dress and it is... not progressing smoothly. Ahem. I made a petite adjustment above the waist in the back, which helped the back fit perfectly, but then the front pulled to the back, so I adjusted the front, too, which sort of made it fit really well, but threw off the proportions of the dress bodice and it didn't look so great anymore. But the waist seam is actually at my waist.

And the square neckline is not square, it curves upwards.  After slicing and dicing the front chest for more room, the neckline sat much better, but still curves up. It looks better square on me, I think.

Then I moved to the skirt because the back had diagonal folds of fabric hanging down from the side waist to center back. I assumed this was a sway back alteration, so I tried to alter for that, but was unsuccessful. Then, I just substituted in the shaping of the back of my EvaDress trousers and that took care of the problem, almost. It's hanging much better, but still has a few folds, they are just shallower and don't extend down as far as they did.  The bottom of the bodice is really curved, too

I realized the skirt probably doesn't fit me because I don't have the proper shaped undergarments. And I have to say, I'm okay with that.
1956-girdle
Jeezy-creezy!

The bottom seam of the bodice has an exaggerated curve, which is probably a culprit in the skirt not hanging properly, as well. So my next tasks are to try to redraft the skirt and straighten the waistline, and see if I can get the bodice to both fit and look proportional.

Writing this all out highlights all the problems I'm having with this pattern, and usually I'd be hyper-annoyed by this, but it's actually keeping my interest, so much so that I'm avoiding other things that usually keep my interest3.

1. Note: when using slippery fabrics as the backing for quilts, they tend to, well, slide, and you end up waking up in the middle of the night shivering.
2. Originally slated for a dress I saw in a magazine in 1999 and still have not drafted the pattern for.
3. Sorry, harp. Really, I'll be interested in practicing again someday.
motorharp: line drawing of kid with glasses intently reading (bookworm)


DSCN1736 DSCN1735
DSCN1741      DSCN1738
Top: 1st glove
Bottom: 2nd glove


So these aren't as polished-looking as I'd like, but much better than the machine sewn gloves. By far.


DSCN1727
Original gloves + 1/2"


I think that has to do mostly with having a better pattern. I took apart some vintage gloves that I loved and wore to death and made a pattern. That way, the pattern already had all my finger... quirks molded in.  Except for the quirk that my palms are a size medium and my fingers are an extra 1/2 inch longer. Or, as I found out after making them, my thumbs and pinkies are only 1/2" longer, my other fingers are 5/8" longer. Geez.

I also left the fourchettes in a "V" shape because I didn't think the grain of the stretchy fabric would make that much of a difference (It would if it was really stripey, but the bias in between the fingers might also look pretty cool.) The original fourchettes were stitched into a V after construction, which in hindsight, would make them easier to stitch.


DSCN1728
Top: Sulky Cotton "Petite"
Middle: DMC Perle Cotton No 8
Bottom: Original (cotton?) thread


I managed to salvage a goodly length of the original thread used to sew the gloves. It appeared to be either cotton or silk, although since "100% cotton" was written/stamped on the inside of the gloves, I'm assuming it's cotton. And no, I'm not going to light anything on fire, thank you. (Which reminds me, I need to check and make sure my fire extinguisher is still pressurized.) The original gloves were sewn with a double length of thread.

At the fabric store, I chose two threads that appeared to have the same kind of twist as the original, and one to match and one lighter weight. I sewed the left-hand glove with the perle cotton, which was a bit too much of a pull to get it through the thinner fabric. The right-hand glove got the Sulky Cotton treatment, and it was much easier to pull the threads through.

My next project will be to try these with actual heavy-weight ponte knit and see if the edges look more finished and less ravely.

Do any of you know a source for 100% ponte knit? My google-fu turned up nothing - the places that say they have 100% cotton ponte in the search results, don't.
motorharp: line drawing of kid with glasses intently reading (bookworm)
Or, at least, I can't. (I'm sure if I had special machines, I could.)

             DSCN1724     DSCN1725

I made this with a ponte knit, or double knit, I can't remember. It's theoretically what gloves were made out of back when people wore gloves on a daily basis. However, the fabric I found is much lighter weight and stretchier.

Interesting fact learned: my left hand is bigger than my right, which is why the thumb is ripped out.

I'm going to see if I can find some heavy thread and try to sew a pair by hand. Also, I'm scrapping my pattern and making a pattern from my favorite pair of vintage gloves that are absolutely trashed (holes, snags) and too small which I just cut apart. We'll see how that goes.
motorharp: line drawing of kid with glasses intently reading (bookworm)
The last and most recent project is another skirt based on the skirt Flora wore in "Cold Comfort Farm".

Cold-Comfort-Farm-skirt
I saw something nasty in the woodshed!


I drafted a version of it a few years ago, couldn't find the pattern recently, so drafted what I hope will be a basic A-line skirt block THAT I WILL KEEP AND NOT LOSE, and added a pleat in both the front and center back seams. This is also the skirt I croquised and subsequently realized the 50s skirt I wanted to make actually needed to be this pleated skirt. Alas, I did not have enough fabric for pockets.

Aaaand after cutting it out noticed holes right down the front - hard to notice on a double layer of fabric. I don't know if they've been there the whole time, or developed because the fabric has been undiscovered in my stash for so long. But I fixed them with a few little squares of fusible knit interfacing.

Flora-skirt-holesFlora-skirt-patches


The pleats are handy both for striding towards a camera while looking grim, and riding a bike while looking like a dork (I'm assuming).

Flora skirt


I may need to adjust the block for a swayback, or simply stand up straight.
Flora skirt

And since the fabric has a subtle blue pinstripe, it will be a good match for this sweater:

Blue Beaded Sweater
Someone fire the maid for her ironing skills, pronto


You can once again see more in my Flora skirt flickr set.
motorharp: line drawing of kid with glasses intently reading (bookworm)
Brrr! Back to the cold. This is why I was glad I frantically took pictures when it was sunny.  Well, sort of glad. These trousers really don't look like what I thought. Not quite as flattering, really. This is why I take photos - the camera doesn't lie.  Maybe I could have been tipped off by the overalls I made from the same pattern that also make me look short and wide - the pattern being EvaDress T30-1936 (which doesn't seem to be available anymore). However, they are comfy.

T30-1930-EvaDress
Tall, leggy models*


1936-trousers-front
Non-tall, non-leggy model*

They are a lovely wool flannel from Mill End, and hey, guess what! Wool flannel stretches.  The other pants I made out of sturdy cotton twill were too short, so I added a couple inches to the hem this time, only to cut them right back off after the material stretched. I made the bound buttonholes this time and like them WAY better than machine made.

1936-trousers-side
Do these classify as Oxford Bags?*

I also had to interface the waistband with fusible tailoring hair canvas in order to hold the weight of the pants + lining. Did I mention these are lined? Buttery soft hang-loose lining. So, like I said, comfy.

Oh, has anyone figured out how to get the $@#*^ ridge line of a tucked-in shirt to go away?

*Livejournal seems to not allow clicking on photos to embiggen anymore, so you can right click and choose "View Picture" and see a bigger version.

Profile

motorharp: line drawing of kid with glasses intently reading (Default)
motorharp

March 2025

S M T W T F S
      1
2345678
9101112131415
16171819202122
23242526272829
3031     

Syndicate

RSS Atom

Most Popular Tags

Style Credit

Expand Cut Tags

No cut tags
Page generated 6 Jul 2025 07:16 am
Powered by Dreamwidth Studios