motorharp: line drawing of kid with glasses intently reading (Default)
Continued from the previous entry...

The chair is finished!
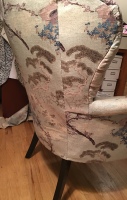
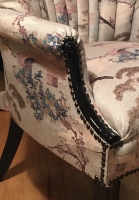
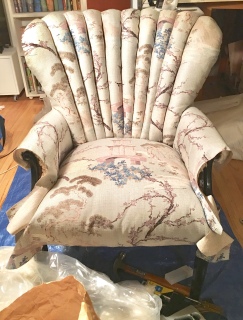
The finished channel-backed chair

I spent the day - off and on - hammering in nails. I think I started a few days ago. Time is passing too quickly!

The tip from the seller to use needle-nosed pliers to hold the nail while hammering it in was incredibly helpful. I bent far fewer of them and didn't smash any of my fingers. More than once, anyway. The nails were also a little too textured and matte, so I used my dremel to buff them, and now they have a nice worn, shiny look to them.

The nails aren't evenly spaced, but I used the original holes, so they must have been uneven on the original. It's not my fault!

Some things I'd change if I were more of a masochist: figure out some way to upholster the wings so they aren't wrinkly, and make the fold in the side fronts face the back instead of the front.

I do like the way I managed to pleat the deck cushion at the corners.

And having instructions on how to insert pligrip was so helpful! The curved back section of the wings came out very neat and smooth. The non-stuffed part, that is.

Anyway, here are some more pictures:

Three quarter view of armchair with Asian inspired fabricBack view of upholstered armchair with Asian inspired fabricCloseup of arm of upholstered armchair with Asian inspired fabric
That back seam is hand sewn, thank you very much!

motorharp: line drawing of kid with glasses intently reading (Default)
Continued from the previous entry...

Everything is pulled as taut as I could get it. I think with shaped channels, it wouldn't have been such a struggle. The channels are all different sizes, but the chair is comfortable, which is a vast improvement.

I couldn't quite figure out how to stuff the side panels, so I winged it (haha) and just kept stuffing them with cotton batting until they were about the same firmness.

Channel-backed chair with new channels

But the sides are wrinkly. I couldn't find instructions for that particular configuration of channels and wings. I thought the pli-grip would take care of that when I put the back on, but it didn't.

The pli-grip looks a lot better on this version of the chair thanks to Amanda Brown's instructions in Spruce.  However, I ran out of pli-grip and refused to wait and go to the store for more, so hand sewed the back panel on. I did a surprisingly amazing job on that. It's also a much better sewing job than the previous one, where I also ran out of tack strips.

Now I'm just waiting for upholstery nails (or clavos) to finish up the front.
motorharp: line drawing of kid with glasses intently reading (Default)
Continued from the previous entry...

The upholstery job I did back in the 90s always bugged me because I really didn't do a great job with the channels. Instead of using the original stuffing - I think it was in bad shape - I used foam cut into strips. I could see the edges in some of the channels.

I decided this time that I would use cotton batting, which is what is normally used. Unfortunately, the Singer upholstery book did not have information on constructing channels. The various youtube videos I watched all had special equipment to stuff the channels, and didn't actually describe how to make them. The Upholstery at Home book just said to cover the old channels with new fabric, with no information on how to stuff them or make them from scratch.

My plan, since I had no special equipment, was to sew a vertical seam, roll up cotton batting, stretch the fabric over it, and sew a vertical seam right next to it. I found I could NOT sew straight in that situation, but since that was my only option, I continued. It was arduous. I bled, luckily only on the muslin backing.

The back piece is simply leaning against the chair here, so nothing is pulled taut.

Channels for back constructed and resting on back

The original channels were not straight. However, in the 90s upholstery job, I used striped fabric, and wanted the stripes to run along the channels, so I made them straight. I kind of forgot about this, and after I finished, I found the upholstery book Spruce. I really wish I had found it before I made the back! It's an incredibly comprehensive upholstery book, and channels are included. The author, Amanda Brown, goes into detail on how to measure, cut, and sew shaped channels. Unfortunately, she only talks about stuffing the channels with upholstery channel tins.

Next time I upholster the chair, I'll get the channels right. Haha.
motorharp: line drawing of kid with glasses intently reading (Default)
Continued from the previous post...

I got up very early to do the arms:

Chair with seat and arms upholstered
 
I put a LOT of padding on the arms, in the hope that I can actually rest my elbows on them, instead of grinding my elbows into the wood underneath the padding. I used some of the old cotton batting, covered with new cotton batting, covered with polyfil.

A note about the polyfil - upholstery polyfil is about an inch+ thick, and you can separate it into two layers. I was just using scraps of 1/2" I had from sewing projects.

motorharp: line drawing of kid with glasses intently reading (Default)
Continued from the previous entry...

Sooooo, Fabric Depot did not have enough of the upholstery fabric, according to Reupholstering at Home by Peter Nesovich who recommended 5 yards for a channel-backed chair, so I ordered 5 yards from Regal Fabrics. It arrived quickly, and with a yard stick, thanks!

Chair with new deck upholstery
This is the second attempt at covering the seat. *sigh*


I pulled the first waaaay too tight, and ended up right back where I started with an uncomfortably hard seat. I have to say the squishy edge roll makes a huge difference in comfort. My sister helped me this time, and it went really fast.

I used muslin to contain the stuffing instead of burlap, because burlap makes me sneeze. I left the old burlap in there, as well as the back webbing.
motorharp: line drawing of kid with glasses intently reading (Default)
Continued from the previous post...

After hemming and hawing about spray paint vs. liquid paint, I went with liquid. It was cold outside, and I didn't want to have to spray inside.

I taped up the chair, sanded the arms and legs lightly, and used Dalys Crystalfin Gloss clear coat to seal the wood, in case I ever forget that I never want to recover this chair again, and want non-painted wood.

I bought Krylon ColorMaster Acrylic Latex enamel in Black Gloss. Who knew Krylon came in a can! It's a really convenient 8 oz size for small projects. And it's super shiny! I think I did two coats. Maybe more because I kept seeing spots I missed. Then another clear coat.

After taking the fabric off (I found 22¢! And razor blades! Uh...) I remembered how beat-up this chair is. The top back is cracked, and it has a brace from the 90s upholstery job1.  The bottom where the springs are tied is thrashed. So even though the springs needed retying, I didn't want to dismantle anything. So I just piled a bunch of stuffing on top. It's SO much more comfortable.

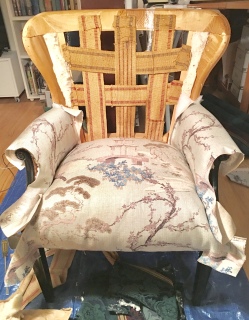
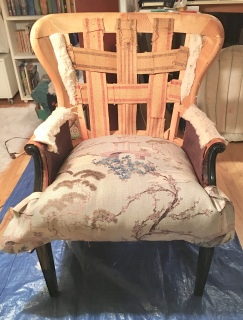
Unupholstered chair painted with deck padding
I lightened the photo so the black arms and legs show up a little better.
 
You can also see the edge roll of doom on the floor. Another reason the chair was uncomfortable. This edge roll appeared to be made out of paper, and was hard. Possibly harder than the wood it was nailed to. So hard I thought I had left it out when I reupholstered it last time and it was really the wood edge that was digging into my hamstrings all these years.

I made my own edge roll with cotton batting and the webbing that's also pictured on the floor. Mine's better.


1. We also kept records of what we found in the chair at that time: pipecleaner, pencil, tooth from a comb, rubber band, pencil eraser, bead, bobby pins, watermelon seeds, pine needles, and a paper clip.
motorharp: line drawing of kid with glasses intently reading (Default)
I "inherited" a chair in college. It showed up at some point in the house I lived in, and I took it with me when I left. It might have been a pinkish brocade at that point. I assumed it was from the 50s or 60s.

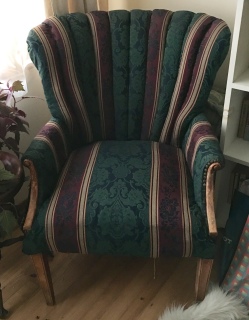
My sister and I reupholstered it sometime in the late 90s and it turned into this:

Channel-backed chair with striped upholstery

Even though I swore I would do no more upholstery after my couch, I decided this was too dark and made the room look smaller. And I didn't like the way the channels had turned out. And I never really sat in it because the arms weren't padded enough and hurt my elbows. And the colors weren't ones I liked anymore and they didn't match my couch either. Et cetera, et cetera.

I shopped for fabric with light green in mind. I found Regal Fabrics Zen Flax in Fabric Depot. Despite the color being flax, the background was a light, dusty, blue-green - exactly what I was looking for! And it was Asian-influenced, which kicked off another idea: I could paint the wood arms and legs of the chair a shiny black.

Later that day...

Channel-backed chair with no upholstery
motorharp: line drawing of kid with glasses intently reading (bookworm)
Shot of my couch with no cushions and all the blood spots highlighted
Blood-soaked before

Shot of my couch with no cushions and clean new lining and upholstery
Clean after

The seat cushions are still a little wrinkly because while I have new, properly deep inserts for the back cushions, I haven't replaced the old inserts in the seat cushions, so they are still pretty flat and don't fill up the covering. Regardless, I really, really love having something new and clean and stain free and lighter in color and comfortable. Etcetera.


Unfortunately, the "new" couch has cast every other furnishing I have in a new light, and now I hate everything else I have. Grumble. Rug, throw pillows, upholstery on my other chair, tv stand, shelves. Etcetera.
motorharp: line drawing of kid with glasses intently reading (bookworm)
sea-green
I finished one couch cushion.

I made a silk bandana with a hand-rolled hem to sleep in to see if it keeps my hair from frizzing. Sadly, it was faster to do this than use either machine.

I'm reworking the buttonholes on my blouse. Again. But this time with better, thicker thread.

I gave the newly-repaired serger a test run in preparation for revamping a sweater. It didn't go so well. :( Further testing is needed in order to determine if problem is of machine origin, or operator error.

In other news, today was...difficile.
motorharp: line drawing of kid with glasses intently reading (Default)
I went to the foam store to drop off the rest of my toxic foam for recycling so I wouldn't be tempted to USE IT AGAIN. Ahem.  Yes, you can recycle foam - it apparently gets cut up and made into carpet padding.  But hey, at least it's not being manufactured all over again.

I got to chatting with the owner (he's the only guy I've ever seen there, so assuming) and asked about padding other than foam.  He said latex is really good as there's no off-gassing.  Also, it's thoroughly washed (and scoured?) so the proteins that people are usually sensitive to are removed. Latex gloves are not washed so they are easier to put on. O_o That explains a lot. And people are still better than google.

The price for getting cushions for my entire couch would be a little over $200, which is way better than $200 per cushion like I was thinking.  I would definitely need to get some sort of inner foam core for my couch because the all-wool batting cushion I made for my chair is already not squishy anymore.

motorharp: line drawing of kid with glasses intently reading (Default)

I AM ALLERGIC TO FOAM. 

I'm not yelling at you all, I'm yelling at me.  Apparently, when I got dizzy and a sore throat and felt bad in general during my last project featuring foam and unwashed fabric, that failed to sink in. 

During my weekend, I decided I was tired of sitting on my accent pillow to get myself to the right height at my harp, so was going to "quickly throw together a cushion!".  Yeah, famous last words. 

After getting over the above-mentioned side effects (including a fever, yay!), I did a little digging on alternatives to polyurethane foam that would be less toxic to me, because at some point I'd like to reupholster my couch and would prefer not to have to give myself neurological damage while waiting for it to finish off-gassing.  While researching, I discovered that polyurethane foam is considered "solid gasoline" by fire fighters - "[Untreated] Ignited polyurethane foam sofas can reach temperatures over 1400 degrees Fahrenheit within minutes." And the gas produced during burning is lethal.  Great. 

Some alternatives are:
+ Soy based foam - still full of petrol-chemicals, apparently.
+ Natural latex - minimal off-gassing and not highly flammable, but super expensive. And I may be allergic to that, too.
+ Polyester batting - used it before and not allergic, but what does it do when ignited?
+ Wool/cotton/bamboo batting - Washable, but are these as lofty and resilient as polyester?
+ Blue jeans - probably not the best for a pillow, but might be good for padding applications in upholstery.
+ Mushrooms - Um. Probably not applicable for any project I might have, but... it exists.

What did they use in the old days?  They just had really uncomfortable horsehair furniture?

Just out of curiosity, I emailed the Portland Fire Marshal and asked what's the best materials to upholster with from a fire-safety standpoint.  I really hope I get an answer.

So my simple project turned into a little bit more than I bargained for, but after a quick trip to the fabric store, initially to purchase more polyester batting and discovering they have a decently wide selection of battings, I came home with wool batting (surprisingly lofty!) and finished up my seat cushion. 

I'm breathing just fine.


Profile

motorharp: line drawing of kid with glasses intently reading (Default)
motorharp

March 2025

S M T W T F S
      1
2345678
9101112131415
16171819202122
23242526272829
3031     

Syndicate

RSS Atom

Most Popular Tags

Style Credit

Expand Cut Tags

No cut tags
Page generated 7 Jul 2025 08:47 am
Powered by Dreamwidth Studios