motorharp: line drawing of kid with glasses intently reading (Default)
I just finished reading Overdressed by Elizabeth L. Cline (2011). In it she talks about how fast fashion is bad for the environment, workers, and, well, fashion.  One of the ways to she says we can mitigate the effects of fast fashion is refashioning. It was timely because - I did that!

I have been doing that with my clothes and thrift store clothes for years, decades at this point.

Earlier this year, I went through my closet and sorted things into piles: keep, toss, mend, I want a new one, and I wish this were something else.

I made McCall's 7439 c. 1964 size in black corduroy with Bemberg Cupromonium Rayon underlining a few years ago.

McCall's 7439 vintage sewing pattern c. 1964

I made the collarless version. I thought it would be a nice basic wardrobe piece. It was not.

I've had Simplicity 3369 c. 1960s size 14 on my to-make list for a long time.

Simplicity 3369 vintage sewing pattern c. 1960s

Could I get this jacket out of the dress?!?

Since the dress had raglan sleeves and the jacket had set-in sleeves, it looked dicey. I held the jacket sleeve pattern pieces to the bodice pattern piece and kind of held it over the dress. (Suuuuper not technical or precise.)

Surprisingly, the finished dress bodice was pretty much the same exact width as the jacket pattern.  The jacket pattern just had straight side seams. I could just reuse the bodice! 

The sleeves looked ok? So they could stay attached!

Which was weird because it was a really fitted dress. They were both a size 14 - maybe the pattern companies all used the same fit models and slopers?

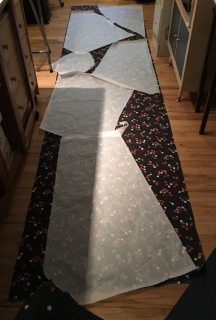
But oh well, I just wanted to make something, so I dove in, removed the side zipper, ripped the side seams, took out all the darts, took off the skirt, and started laying out pattern pieces.

I still had scraps in my stash.

So, would there be enough to make it? Yes! Sort of.

Note: The photos show how wrinkled it is because I'm wearing the heck out of this jacket.
And I loathe ironing.


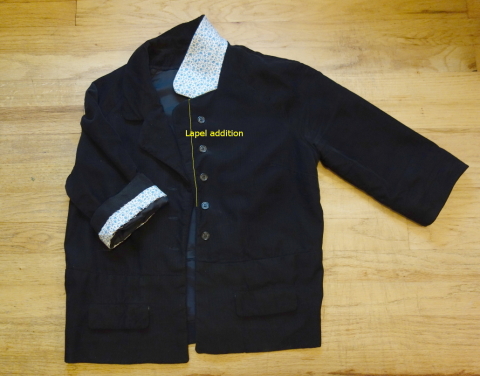
The skirt made the jacket longer (with pieced lengths), filled in the side seams, and lapel facings (which are pieced).


The sleeves were almost long enough as is - the cuffs, when undone, were a lot of extra length.

Scraps made up the collar and finished the lapels.

And the corduroy was done. Slivers were leftover.

So sturdy cotton pajama fabric lined the collar and pockets, and extra lining to cover horse hair canvas that should have been under the underlining.

Worst finishing job on the inside of a jacket ever. Worse than fast fashion, though?

Because the lapels had so many pieces, it's super bulky and won't iron flat. Do the buttons and buttonholes work? No! But I wouldn't be able to button it anyway because it's a little snug.

But I don't care! I love this thing. I've worn it approximately 34 times more than the dress. It's exactly the sort of crumpled, vintage-y looking jacket I wanted.
motorharp: line drawing of kid with glasses intently reading (Default)

This was another exercise in translating.

This is the Twisted Dress from the Japanese sewing book "Garments of a Dignified Lady" by Koji Takiguchi (2014) published by Bunka.

The second-most challenging aspect of this dress was fusing the tape onto the armholes and neck edge. On very shifty fabric. Fortunately, I got help with that from [personal profile] gorthx , thank you! Also, sewing very shifty fabric.

The dress is made from two layers - polyester georgette and sandwashed rayon - twisted at the hem before sewing together.


It went together pretty simply and quickly, and I noticed that some of the construction techniques were used in RTW, like the armhole finishing.

The sandwashed rayon is luxurious and I miss those rayons from the 90s. Very heavy and drapey.

I forgot to try this on before completely sewing it up. It would have been pretty easy to do that with just the lining. Instead, I found out after the second-to-last step of mostly sewing the hem that the armholes are pretty low. LOW.  I added at 3" high gusset to the underarm by taking apart the main fabric and lining and sewing the main-fabric-and-lining-double-layer gusset to each layer separately (so the dress could still twist). However, I could have just sandwiched the gusset between the two layers and sewn them all together and it would have been fine, as the dress would still twist.

Underarm gusset in Twisted Dress

The hem is what gives the dress the twist and bubble hem - you layer the dress wrong sides together, and bring the left side seam to the right side seam at the hem, and sew them together, leaving an opening to turn the dress right side out. Which it already was? I had to put this down and talk a walk to figure it out in my head before doing it. It worked, but I'm still not entirely sure how.

If I make it again, I would probably add about 1/4" in width to the outside armholes. This could be fun with contrasting colors of lining and sheer main fabric.


I like it because it's very comfortable, but I'm not sure about the bag shape on me. I feel like it needs pockets.
motorharp: line drawing of kid with glasses intently reading (Default)
I can't say that I ever feel dignified on a regular basis. Or on an irregular basis.

The translated title of this book is Garments of a Dignified Lady. Um. Can I actually wear these if I'm not dignifired? Or will it turn me into a dignified lady. Do I want that? 


Regardless, I fell in love with the blouse on the cover of this book by Koji Takiguchi published in 2014, and bought it without knowing what else was included. There are so many other wonderful garments in here that I started making dresses before anything else. And these are not my style of dresses - asymmetrical and arty.


I decided to test the "Dress with Handkerchief Hem" with some of the vintage fabric a coworker gave me. It fits fine - it is unstructured and loose enough that choosing to make size ML, instead of M, probably didn't make too much of a difference in the end result.


It probably would have made a
difference in the cutting layout, though!

The fabric is 100% cotton broadcloth and tends to stick to itself and wrinkle. I was going to dye it, since the red and greens are not my colors, however under the chiffon dress, it looks lovely. It adds depth and dimension to the colors. As usual, I have yet to take pics of the chiffon version.

Probably the hardest part was translating the instructions. I figured out, for the most part, using the google translate app and this helpful Japanese sewing terms translation list, what the instructions said. The only part I couldn't really figure out  were the instructions on finishing the hem. A friend who studies Japanese figured out that google translate's "throwaway sewing machine" actually meant staystitching. So the hem is left raw and staystitched, as it is all cut on the bias.

And I did keep my sewing machine.

motorharp: line drawing of kid with glasses intently reading (Default)
It's taken me a while to just grit my teeth and get on with writing this up. I finished this back in August. It's now March.

Circle Dress Front

What went right:
This is a drafting exercise from the very beginning of the first book of the Pattern Magic series. After I got a decent sloper, I decided to test this design in a real garment. I combined the "Inserting a circular design line" with the skirt from a 1940s Simplicity pattern, and using more of the upholstery fabric you can see me standing next to.

I interfaced the entire front bodice based on what I learned by taking apart a RTW dress. I found that Pellon 865F Bi-Stretch Lite was closest in look and feeling to the interfacing in the RTW dress. I detailed this in the Circle Dress Part 1 entry.

I used fusible tape on the armholes and the Pellon on the neck facings.

The circle seam in the front has a 1/4" seam allowance and wow, do 1/4" curved seams ever go together well. I didn't have to clip anything.

I took in the side seams a little to get a closer fit.

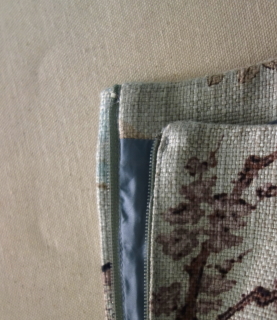
For sewing and inserting the lining, I used tips from more of Kathleen Fasanella's site about "A better way to sew linings and facings" Part 1 and Part 2. For inserting the lapped zipper, I used her tutorial "Lapped zipper construction". I'm really please with how it turned out.

Circle Dress Zipper

I really like the fit of this dress as well as the weight of the fabric, how easy it washes and wears, and the drape. I think I might make more dresses out of upholstery fabric!

What went wrong:
This dress really wanted to be a mirror image of itself.

I liked the fabric so much I made a skirt out of the extra - the upholstery book said I needed 5 yds for a channel back chair (I needed maybe 2?) - and then thought I might have enough for a dress.

Pocket skirt in upholstery fabric

I managed to cut out two left back bodices, two left back skirts, then another back bodice piece with the wrong center back seam allowance, effectively making it... another left back, but wrong side out. So a right back, but un-useable.

I think something went wrong with the pockets, but it's been so long at this point I can't remember.

At that point, I was reeeally running low on fabric, and in order to get a complete skirt back, I had to piece one together from slivers. If you look at this photo closely, you might see it. If not, great!

Circle Dress Back

I've washed and worn it a few times and it washes and wears wonderfully. I'm just going to take a breather before tackling something like this again.
motorharp: line drawing of kid with glasses intently reading (Default)
I interfaced the entire front bodice of my circle dress based on the example dress I deconstructed. I found that Pellon 865F Bi-Stretch Lite was closest in look and feeling to the interfacing in the RTW dress. 

Also, it did not have the normal sewing industry interfacing instructions - hold the iron on one area for 10-15 seconds. They said to glide the iron across the surface. And I had just read Fashion Incubator's "How to apply interfacing", in which Kathleen Fasanella said basically the same thing, but much more in depth. I used to hate fusing interfacing because it took so long! Just ironing it on is such a relief.

After I figure out whether I need stabilizers on my back darts, I intend to construct the dress using a combination of what I learned from the RTW dress and, again on Fashion Incubator, articles about "A better way to sew linings and facings" part 1 and part 2.

The article "Interfacing, 10 tips" has good info, too.

I sewed the circle dart and the CF seam. The circle seams are 1/4" and the CF seam is 3/8".  Sewing a curved seam with 1/4" SAs is so amazingly easy. I did not have to clip anything and it went together so smoothly. SO SMOOTHLY.

Oh, and I may need to trim the back darts?

motorharp: line drawing of kid with glasses intently reading (bookworm)
I am still working on the muslin for a dress to play the harp in.  My excuse for not being done with that, and the final dress, and have already purchased shoes to go with it (and a whole other host of harp-related things), is how unbelievably hot it was this summer, but it's more a combination of that and minimal internal encouragement.  So much so that I've been repeating one of my favorite quotes while sewing this morning more than usual: "There are no experimental failures - there's only more data." -Bryce Lynch in Max Headroom. It has kept me sewing this morning. Seriously.

The muslin doesn't fit and look exactly like I want, but I'm unable to adjust it further because I have no seam allowance left, and I started with 1" SA!

I also read through my Deconstructed Dress post to see if I wanted to add any stabilizers.  The type of stabilizing on that dress won't work with a dress that's underlined.

Off to collect more data!
motorharp: line drawing of kid with glasses intently reading (bookworm)
I stayed up late taping this together:

Reeeally need to get a new camera


It made me giggle.

Next up is drawing the style lines on the dress and cutting it back apart to get a sense of what the pattern pieces will look like, as well as where the seamlines will be so I can figure out how to arrange the fabric design.

The pattern is Vogue 9712 and includes a petticoat pattern.
motorharp: line drawing of kid with glasses intently reading (bookworm)
I found another dress I like - this one is a little more casual and would work for daytime gigs.

Although it's sleeveless, I like the line of this dress.  I think cap sleeves could be added and still look good.

I can't figure out what kind of mesh they are using. Or how the denim is attached to the mesh. However, it looks like the stretch denim is cut on the bias. It also doesn't look like they used darts to shape it, which would make sense if the whole thing was very stretchy.

This fabric-making technique would maybe work well in other styles of dresses, as seen here in EvaDress's 1939 gown. A blog post about the original dress that inspired her, as well as how she made the fabric is here.

ETA Oh! And Lorelai's dress from "They Shoot Gilmores, Don't They?" dance marathon:


I should look through my vintage patterns to see if this would work for any patterns I already have.  Another thing to add to the to do list.  Or the TADA! list. :)
motorharp: line drawing of kid with glasses intently reading (bookworm)
EvaDress is having a contest to sew something from their 40s collection of patterns. And I need nicer clothes for performing on the harp!  What a fortuitous coincidence.

The contest runs from April 16 to June 1 and you can post your project on the facebook page that's linked above.


I chose the pattern D40-3863, view 1. This dress style works well for playing harp because it doesn't have an armscye right at the shoulder, so there's nothing to bind when I'm reaching my arms forward.  Straight skirts don't work for sitting behind the harp, and this one looks to be A-line, and the wrap will probably give me even more room.  The higher neckline of view 1 seems to work better on me. And the long sleeves are good for hiding chicken wings. =P  Although, it looks like the sleeves could easily be left off, if desired.

I want to get an asian jacquard in either a black and gold combination to match my harp, or some sort of emerald green. Or some combination of the two.  I think it will suit that dress well.  However, I have no idea if that's something that will look good on stage.  Do any of you know anything about dressing for the stage?  Patterned fabric, yea or nay?

Then I thought some sort of embroidery would look lovely, even though I swore after my western shirt I would never do embroidery again, especially on black fabric.

I've already gone shopping for the jacquard, but my usual fabric store changed their line of asian jacquards: they all have religious symbols integrated into the patterns.  Um, just chrysanthemums for me, thanks.

Since I haven't even found the fabric yet, I have a feeling that I will be behind on this project. On top of that, my lack of facebooking means I won't be able to easily post my results, and possibly won't enter.  But I can still use the timeline!

Then in the midst of this planning, McCall came out with their latest Archive Collection patterns...


Droooool.  This would be a perfect dress, too.  I don't know when/if I'd ever need something quite that fancy, though.
motorharp: line drawing of kid with glasses intently reading (bookworm)
So, now we know why Ichabod will be staying in period clothing and where he gets them.  So clever and not just a little hilarious.

And now...
I'm currently working on finishing up the seventh item1 in my "sew one piece of clothing a week" collection... from October.  Things keep getting slipped into the queue as they have a higher priority.  Like resewing the buttons on my pants again because I'm either losing weight or they are stretching.

And putting gussets in the underarm seam of the sixth item - a basic short-sleeved button-up blouse1 - after completely finishing it, because it was one of those situations where the entire shirt comes up when you lift your arms.  Which is really the point of this post.

After reading Kathleen Fasanella's post about how sleeve cap ease is bogus and what a sleeve cap should look like to follow the actual shape of a person, I wanted to try drafting something like that on the next shirt I made to avoid the shirt-rising problem.

The seventh item is indeed a basic long-sleeved button-up blouse from the same pattern as the short-sleeved.  I took the gusset from the short-sleeved and marked the points where it starts and stops on the arm scye. It makes the bottom of the arm scye over 2" (5cm) higher! And it's not exactly parallel to the floor. It slopes slightly down toward the front.  Not quite as much as some of the pictures in the tailoring forums:armhole-cutter-and-tailor-5-5xBut like this:armhole

I can understand shaping the armhole opening, but the sleeve is beyond my understanding at this point.  Measuring my arm around the deltoids and comparing it to the pattern measurement makes me think I need to add about two inches more in width? Which sort of could correspond to this picture?
sleevecap_comparison

Anyway.

And then there are these which are lesser priority, but frustrating me to think about.

I had to cut myself out of my black and white skirt. Have you ever been able to un-jam an invisible zipper? And it really isn't as full as I originally wanted, so I want to add gores and a new zipper. Which means taking off the bottom black band and making a new one of those.  And I could probably line it this time instead of underlining it. Basically, I would like to make an entirely new skirt. Urg.

The black dress I made from a pattern I thought fit me is exceptionally tight because the waist is too high and I should have lined it, not interlined it.  The corduroy and rayon lining really need to move independently.  Which means, basically, making a whole new dress.  And taking the collar off because it looks a little too... churchy?  Wednesday Addams?

1 From fabric bought for me while visiting home. :)
motorharp: line drawing of kid with glasses intently reading (bookworm)
I'm going to draft the rest of this skirt pattern tonight. With my amazing willpower I will get up out of my seat and clean off the plaster of Paris from my sewing table and get cracking. WITH POCKETS.

black-white-flower-dressblack-white-flower-dress-back-3black-white-flower-dress-back-2black-white-flower-dress-side

I always regret not having POCKETS in my skirts or any garment, really, and always forget to put POCKETS in, so emphasis on POCKETS. POCKETSPOCKETSPOCKETS! I'm forgetting it even as I'm typing it! Geez.

DSCN2192

The fabric is 100% cotton decorator fabric that gorthx gifted me a while ago. It was waiting for a decoupage project, because I thought I only had .5 yds, but it turns out it's 1.75 (yay organized stash!). And it fits in really well with my black and white themed collection. Thanks, gorthx! I hope I can piece it as drawn with the yardage I have. The back has slight variations I can't decide on.

The top will come later - a simple boat-neck sleeveless dealy I think I can draft from... something vintage.

Also, I'm debating on sewing this as part of the Fall For Cotton Sew-Along.

My custom lasts are drying in their negative molds. I'm highly suspicious they will not come out well in the toes.

POCKETS!
motorharp: line drawing of kid with glasses intently reading (bookworm)
The shoes have been put on hold while I waited for the book to come back to the library, so I switched to...

Making a swimsuit for a vacation that was also, however, put on hold while I waited for the fabric to be pre-washed, so I switched to...

Making things from my stash, which was what I had originally planned to do in January, but was sluggish and unmotivated at that time, which worked out ok because pattern review is having a stash-busting contest.  Based on the person who's already sewn 24 yards1, and the next who's sewn 14, I won't win, but whatevs.

So I've:
- gotten to the point where I'm going to finish the upper and wrap it around my last
- croquised my swimsuit and decided on a design
- made a beach cover-up
- finished the pinstriped dress
- re-fashioned a mohair sweater
- shortened another sweater
- made a headband
- made 3 t-shirts


I'm also working on getting some music I recorded about 7 or 8 years ago up on bandcamp. I need to make some sort of album artwork, and I think I'm close to being done with that.

1 Oh, pardon me, it's actually 36.
motorharp: line drawing of kid with glasses intently reading (bookworm)
I got the pinstriped dress cut out yesterday evening despite being fantastically tired. The world seemed to be populated by deceptively sane people who drained my brain's glucose to dangerously low levels.

I decided to use my muslin for underlining, as the fabric is a little bit more lightweight than I had first thought.  Then I'll line the skirt with either whatever I have in my stash or whatever I find on my fabric store run.

Also, I was inspired to start croquising a bathing suit from fabric that's been in my stash for probably close to 2 decades. I hope it still has all its elastic properties! I was doubly inspired after seeing this suit in To Catch A Thief.

to-catch-a-thief-swimsuit
Brigitte Auber


The fabric is blue with white polka dots, and has a nice piqué-like texture.

Blue-White-Polka-dots
Not to scale
motorharp: line drawing of kid with glasses intently reading (bookworm)
A few days ago I was croquising (really, it's a word) some vintage patterns to see what might work for some weird, pink, faille, cotton/rayon? fabric I have, which will be dyed, thank you, as I'm not too much of a pink person. Why do I have this fabric? It was super cheap and I used it to line the back of a quilt I made *mumblecough* years ago1. So I have decent yardage.  One of the dresses I thought about making was Retro Butterick 6632.

Butterick-Retro-6632

After croquising it, I realized I had other fabric in my stash that would work really well for this (donated *mumblecough* years ago by my sis2, and remembered and easily accessed now that I'm all organized).
navy-blue-ecru-pinstripe-small

I've been muslining this dress and it is... not progressing smoothly. Ahem. I made a petite adjustment above the waist in the back, which helped the back fit perfectly, but then the front pulled to the back, so I adjusted the front, too, which sort of made it fit really well, but threw off the proportions of the dress bodice and it didn't look so great anymore. But the waist seam is actually at my waist.

And the square neckline is not square, it curves upwards.  After slicing and dicing the front chest for more room, the neckline sat much better, but still curves up. It looks better square on me, I think.

Then I moved to the skirt because the back had diagonal folds of fabric hanging down from the side waist to center back. I assumed this was a sway back alteration, so I tried to alter for that, but was unsuccessful. Then, I just substituted in the shaping of the back of my EvaDress trousers and that took care of the problem, almost. It's hanging much better, but still has a few folds, they are just shallower and don't extend down as far as they did.  The bottom of the bodice is really curved, too

I realized the skirt probably doesn't fit me because I don't have the proper shaped undergarments. And I have to say, I'm okay with that.
1956-girdle
Jeezy-creezy!

The bottom seam of the bodice has an exaggerated curve, which is probably a culprit in the skirt not hanging properly, as well. So my next tasks are to try to redraft the skirt and straighten the waistline, and see if I can get the bodice to both fit and look proportional.

Writing this all out highlights all the problems I'm having with this pattern, and usually I'd be hyper-annoyed by this, but it's actually keeping my interest, so much so that I'm avoiding other things that usually keep my interest3.

1. Note: when using slippery fabrics as the backing for quilts, they tend to, well, slide, and you end up waking up in the middle of the night shivering.
2. Originally slated for a dress I saw in a magazine in 1999 and still have not drafted the pattern for.
3. Sorry, harp. Really, I'll be interested in practicing again someday.
motorharp: line drawing of kid with glasses intently reading (Default)
The dress was (is it "is" instead, now that I've taken it apart? Or is it to late in the evening to philosophize about that?) a TAHARI - ARTHUR S. LEVINE size 6. The shell is 77% cotton, 21% polyester, and 2% spandex. The lining is 100% acetate. It's made in China, and I have to say, very well made. It is this very dress, except made in a brown herringbone fabric:

2012 1030 Tahari Arthur S. Levine Slit Neck Sheath Dress front2012 1030 Tahari Arthur S. Levine Slit Neck Sheath Dress Back

One thing I wondered when searching for pictures of the actual dress and not finding it: is the brown dress from an earlier season and the white is more recent? That would be a really good way to save some production costs. The pattern is exactly the same, just the fabric and embellishments are different. (The brown dress had brass studs around the slit and two rows down the center front waistband, as well as gold topstitching.) It screamed 90s at me in the thrift store, while the above dress does not.

Various things about this dress:
+ The lining was completely sewn in by machine, including the back kick pleat. I drew and labeled a very confusing diagram of what I thought would be the construction process. I remember thinking it was very clever and that I probably wouldn't be able to sew it that way. I was right. I came close though.
+ The construction thread was a little finer than the "all-purpose" polyester home sewing thread. And stronger.
+ The seam allowances were serged after the seams were sewn and the seams were pressed open.
+ The dress and lining were constructed separately and entirely and zipper and back seam were done last. The dress and lining were constructed in a different order.
+ The lining seemed to be the same size as the dress, not bigger or smaller, although there were wrinkles in the lining like it was too big.
+ There was a metric crap-ton of interfacing and stabilizers in this dress.

Let's take a tour:

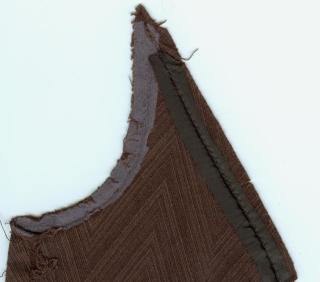
Arm scye side front piece stabilizer and interfacing
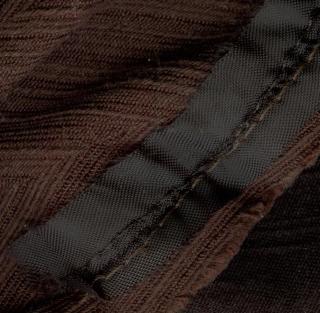
This is the left bodice front. It has a very fine woven interfacing on the princess seam (black strip on right) and what I learned is 3% tape on the armhole seam. I happened to check out a Threads video from the library - Threads Industry Insider Techniques, vol 2 - where they mentioned this exact thing. It's basically Armo Weft cut at a 22.5° angle (half of 45°, or half the bias). It's apparently used a lot in the tailoring industry when you need your stabilizer to be able to curve.

Finely woven interfacing cropped
The above is the fine woven interfacing. The entire bodice front was interfaced, along with the front and back waistband, the neck edge, the neck facings, the kick pleat, and the hem. In the lining, the neck edge and armhole seams were interfaced.

Waistline 3% tape in seams close-up
This is a close-up of the 3% tape. You should be able to click on this pic and get a real closeup. This was used on the armscye (armhole).

Close-up of 3% tape
Another close-up of the 3% tape.

Stabilizer close-up in arm scye
This is some rayon (I'm assuming) stabilizing tape I found only in the armhole. I think. It's late and I don't feel like dragging the dress out of storage. I know I remember thinking the armhole stabilizing was a bit gratuitous.

Bias strips cut from the lining material were used on both the neck edge and in the seam under the invisible zipper.

Profile

motorharp: line drawing of kid with glasses intently reading (Default)
motorharp

March 2025

S M T W T F S
      1
2345678
9101112131415
16171819202122
23242526272829
3031     

Syndicate

RSS Atom

Most Popular Tags

Style Credit

Expand Cut Tags

No cut tags
Page generated 10 Jul 2025 01:41 am
Powered by Dreamwidth Studios